Today we begin designing our game engine. We start with the most fundamental part of the engine: user interface. How are we going to represent our whole game scenario? Each game has different building blocks. There is usually a main menu, an options menu, and a game scene. Different games can have different sets of these and the ones given here are just examples.
Scenes and the stage
The most intuitive way to design a game user interface is to break it into so-called scenes. Each of the components described above is a scene. A game can have a main menu scene, an options scene, a help scene and a game scene, which is where the user actually plays. We also introduce another concept called the stage. A stage represents an instance of our game. Look at it as a play: there is a stage on which actors play their roles; and the play itself is broken into different parts, which is what we call scenes. As the user interacts with the game, we keep switching scenes to show content to the user. Take a look at the following figure:
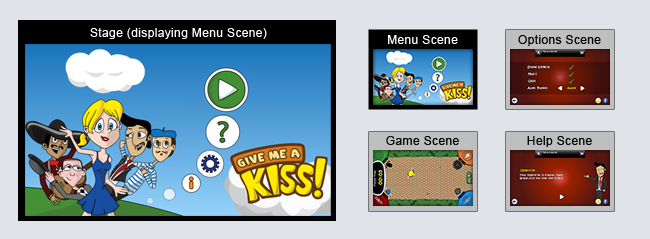
The stage is where actual graphics are displayed to the user. In the figure, the Menu Scene is currently being displayed. As shown in the figure, there are some items in the Menu Scene. Clicking the play triangle button removes the Menu Scene from the stage and replaces it with the Game Scene. Clicking the gear button brings up the Options Scene, and the question mark brings up the Help Scene. As you can see, changing phases in a game project is all about navigating between scenes, and this is the very basic idea of our game engine.
Sprites
What are sprites?
We have discussed the concepts of scene and stage so far. The next step towards designing the UI is what is actually going to be displayed on a scene. Our engine has representations for every single game element. Every character, every gun, and every piece of text should be introduced to the scene somehow.
As we work in a 2-dimensional space, everything can be displayed as images. Each character, each text element, and everything else you could imagine can be simply broken into images. Some elements such as the coin on top of the screen representing score can be single static images, while others, such as a walking character, should be dynamic. When a character walks, the images representing the character change in an animation. So we need something more than just a single image to represent some elements.
We use sprites as our graphical elements. In computer graphics, a sprite is a two-dimensional image or animation that is integrated into a larger scene. Our sprites, while consisting of images, need dynamic capabilities, too. We can summarize these requirements as follows:
- Image presentation
- Possibility of switching images when required
- Movement, rotation and scaling capabilities
- Animation
Artenus engine meets all these needs.
Image atlases
Graphics engines like OpenGL need to load each image into GPU memory before drawing it. A scene might contain many sprites and drawing the whole scene might need a huge number of loading and pre-emption operations, which can degrade performance. To improve performance, most games use image (texture) atlases. The idea is to put as many graphical elements as possible in a single image. Then, whenever one element is to be drawn, the graphics engine will cut it out of the image and place it on the screen. The advantage of this is, once the image is loaded into memory, many sprites will be drawn out of it as the content for all of them is on that image. This eliminates the overhead of constantly replacing images on the GPU. The following figure is an example of an atlas.
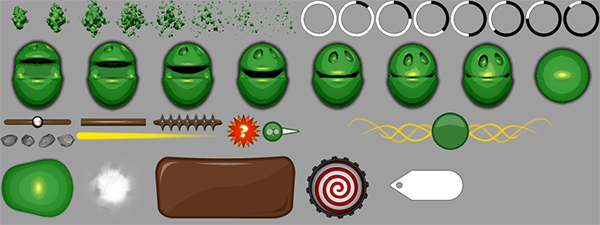
Artenus supports atlases and, for ease of use, we force image atlases for sprite images. If a sprite has, say, 8 frames, all frames should be on the same atlas. There might be other elements on that atlas, but we simply allow an atlas to either contain all elements of a sprite, or none of them. This makes implementation easier. If you take a glance at the atlas above, you can identify groups of images that are closely related, as if they are different frames of the same animation. If these groups are the only images that their corresponding sprites need, then this atlas is a perfect fit for our engine. We can later create a program to generate such grids.
Implementation plan
Before we get started, let’s plot a road map. Here are the steps we are going to take in order to implement our UI framework.
1. Stage implementation
First things come first. In the next day we will learn how to create an OpenGL ES app in Android, draw basic elements, and we will keep in mind our main plan: the game engine. After that we will implement our stage based on what we will have discussed about OpenGL ES. Our engine is a framework and comes in the form of a Android Java library. We will design it in a way that the stage is the main UI element for our engine and everything else starts right there. When our library is complete, all a game developer needs to do is include our library in their project and add a Stage UI element to their app layout.
2. Scenes
Scenes are the next thing we are going to visit. You should know what scenes are now. In our engine, scenes will have their own contexts, defined by the set of sprites they contain, and items loaded into the memory specifically for them. Each scene change will require a context switch. We will implement these basic functionalities, and also implement some predefined scenes.
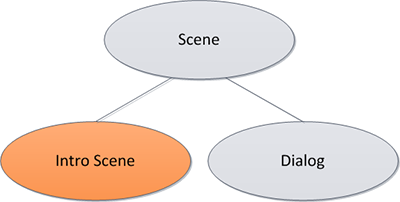
The figure above shows the scene hierarchy. A dialog is a special kind of scene that can come above other scenes, without a context switch. A dialog is useful for when the user is prompted about something or asked something in the middle of another scene. We will also introduce an intro scene. This can be the logo of the game’s publisher or something else that comes up before everything else. The intro scene is no different from any other scene, except that it is handled internally by the stage, without any developer mediation.
3. Texture manager
At the core of a 2-dimensional game is textures. Textures are images that we use. It is important to have textures ready when needed and be able to dispose them when they are not. There are some challenges around preserving textures in different scenarios on a mobile device. Also, we don’t want all textures, specially those not always needed, to load at once in the beginning of the app. This makes the loading process too slow and can cause crashes in low-memory devices. We will design a texture manager that handles flexible loading and unloading of textures. This will take one full day. I will save further explanation for that day.
4. Sprites
We spoke about sprites previously. We will have three kinds of sprites in our game engine. The figure below shows sprite hierarchy in our engine.
As you can see, we have three main types of sprites. Other can and will be added later on.
- Image Sprite: This is the our sprite type. It is composing of an image grid split into different frames. It can show one of the frames at any times. Most of game content will be of this type usually.
- Text Sprite: Used to display text. It can be given font information and a string to display. It also shares basic properties with image sprites.
- Line Sprite: This sprite is used to represent lines and rectangles. It is useful to add screen-wide tints or draw lines without the use of extra images.
Extra objects will be added to assist the functionality of different sprites. Examples are atlases for image sprites or fonts for line sprites. Each of these will be presented in the same day as their corresponding sprite types.
5. Animation handlers
Sprites need animation. Although we will make our sprites dynamic in many ways, we still need something to roll the wheel and make the game happen. A sprite can change in many of its aspects. It can change frames, it can be moved or rotated, and it can appear and disappear, all of which could be handled as an animation. For abstraction, we introduce something called an animation handler. The task of an animation handler is to tick for a sprite and modify its characteristics per frame. We can then define different animation handlers, handling different kinds of animations on sprites. We will implement an abstract animation handler and will also define some basic animation handlers. Here are these basic animations.
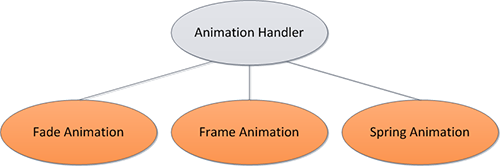
These basic animations are described below (from left to right):
- Fade Animation: Creates a fade-in or fade-out effect for a specific sprite. It is useful to ease sprites in or out of the scene rather than popping them out or away.
- Frame Animation: This type of animation is specific to Image Sprites. It is used to create an animation based on the frames defined for the image sprite. Once this animation is added to a sprite, the frame animation will be handled automatically without the need for the developer to take any further action.
- Spring Animation: This animation is of limited use, but we will have some fun adding a touch of physics to our UI component and it is yet another example of possible animations. What it does is to make a sprite get to a specific state (position/scale/rotation/etc) in a spring-like motion.
The developer can later introduce more animation types depending on their needs and types of sprites used in their game. You probably have other examples in mind now. I now end this day with good news. We will start implementing on day 5!