Today we finally start our engine’s Android library. After this day there will be a distinction between the game project we are working on and the game framework that powers it. If you are new to Android Studio, today will be specially interesting for you.
Starting a library
Projects and modules
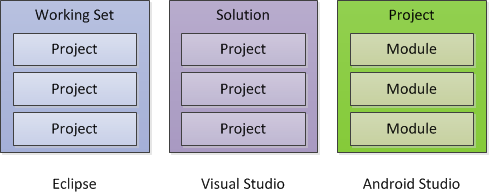
If you are making a simple app, you will probably have a project with all the graphics, meta information, and code files that make up that app. It gets more complicated when you work on bigger solutions. Apart from your specific project, you might also need some external libraries which are not coded by you, or some additional apps to test your app. In other words you will be putting together a few individual projects to work together to achieve a bigger goal. This kind of modularity is addressed by modern IDEs. However, different IDEs handle it in different ways.

Eclipse
In Eclipse you have all your project files in a single workspace. Eclipse’s approach for modularity is through working sets. You can simply group projects that work together into working sets. You can even have a single project in several working sets (a library for example might be needed by several other projects). After this you can focus only on a single working set at a time, which you know will have everything you need for your specific solution.
Microsoft Visual Studio
In Visual Studio you don’t have all your projects in a single view. In fact they can even be widely spread in your file system. VS handles modularity through solutions. A solution is a group of project working together as a single unit. Each project might come from a different source, but as long as it is in the solution, it can cooperate with all other projects. Each solution also has a single Startup Project which is the one that runs when you hit F5 (the short-cut for Debug in VS).
Android Studio
This is what we will be dealing with. Android Studio is based on IntelliJ IDEA. The approach used in that IDE is very similar to Visual Studio. Here you have projects and modules. A single project can be opened at a time, which consists of at least one module. So if you want anything work with your project, you must add it as a module.
Creating a library module
Our project in Android Studio currently has a single Module called “My Game”, but we are about to add another module for our games framework. So if you have your project My Game open, just click “File › New › New Module …” to start creating a module. In the first screen choose Android Library (from More Modules).

On the next screen, you will be asked to give your module a name and choose minimum SDK. We target minimum API level 9, since some features that we use are not available in older APIs. The figure below shows the settings that should be entered for this page. For module and package names you can choose for yourself, but since we will be referring to them with these names throughout this guide, it is recommended that you choose the same.

In the next screen, you should opt out of creating an activity, since it is a library project. When you click finish, you will notice that the library module is added to the project as a sub-directory.
Cleaning up the library
Although we have opted out of as many auto-generated files as possible when creating the module, there are still some additional steps we should take to make it a bare library:
- A library does not need a launcher icon. The drawable-xxxx directories hold this icon in different resolutions. So we are going to delete all of them for now. If we need drawables later we will add necessary directories back.
- The file “values/strings.xml” contains only one value and that’s the app name. Again, this is not an app and consequently we don’t need this file at all.
- Having done the above, we’ve troubled AndroidManifest.xml as it has references to everything we’ve deleted. So, we have to fix it.
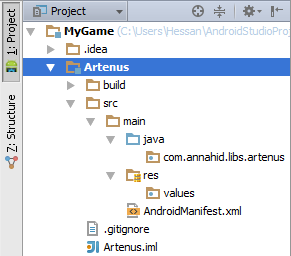
After taking the first two steps, the resulting project will look like this (pretty empty):

For the last step, open AndroidManifest.xml in Artenus module. You can see it has an <application /> tag. This tag is only used to describe applications, not libraries. However, at the time of this writing, we cannot remove this tag in Android Studio, or the library won’t compile. We can, however, strip it of all attributes and child elements, and that will not enrage Android Studio. Maybe this need will be removed in a later release. The final manifest file looks like this:
<manifest xmlns:android="http://schemas.android.com/apk/res/android"
    package="com.annahid.libs.artenus"
    android:versionCode="1"
    android:versionName="1.0">

    <application />
</manifest>
Moving content to the library
We now have a freshly created library, we need to move our content to it. But is moving files from one project to another a simple operation? The answer is what we are going to discuss here.
What is refactoring?
Code refactoring is a disciplined technique for restructuring an existing body of code, changing its internal structure without changing its external behavior. Sometimes you may undergo some changes in your project that only affect your code in favor of speed, readability, or modularity. The user might not feel any difference. Examples of changes can be:
- Encapsulating fields (forcing getters and setters for fields).
- Creating general types and extend them using your several existing types that share a lot of code.
- Replace type-checking code (which is usually bad) with state/strategy.
- Revising your package structure. Moving some files from one package to another.
- Moving bits of code between classes.
Making these changes which leads to a better code while maintaining the output of the application id called refactoring. Android Studio provides a number of refactoring options which can save some development time when they are needed.
Is moving files refactoring?
It depends on what files are being moved. In application development, the answer is most likely yes. The reason is that a file that is part of an application probably has references throughout the code. If it is a code file, it is part of a package and other code units might be using it with a reference to that package. So the effort needed to move the file is beyond just changing the physical location. All references to the class being moved should be updated to the new location/package and possibly the new name. Besides, you are effectively changing the code structure. That’s why you are refactoring by definition and that’s why, unlike Visual Studio, moving and renaming files fall into refactoring in Eclipse and IntelliJ IDEA (hence Android Studio).
Applying it to our project
We want to rearrange our project’s files so each file resides in its appropriate module and package. Our main activity can stay where it already is, because it belongs to “My Game” app. But Stage and Texture are part of the Artenus framework and should be moved to the library. This can be done by choosing the two files, and dragging them to the destination, which is the package com.annahid.libs.artenus in Artenus module. As soon as you drop the files there, a dialog will pop up:

The appropriate options should be already selected. The files will be moved into the package and all references in them will be updated. But there is one small problem. You will probably get this in the end:

The errors are suggesting that the moved classes are used in “My Game” and won’t be accessible any more. You should remember that Artenus is a separate entity and everything in Artenus is only visible there, and not to My Game, unless we explicitly make them visible. That’s what we are going to do next.
Using the library
Referencing the library
We said that classes in the Artenus library are not visible to My Game by default. If we want to use this library we should instruct My Game to use it. This is called referencing Artenus. It is pretty easy to do that in Android Studio. Right-click My Game and choose Open Module Settings. In the Project Structure dialog that opens make sure My Game is selected. Then go to “Dependencies” tab and click the + sign on the right, and from the drop-down menu choose Module Dependency:

There will be only one choice since your project has only two modules. Choose Artenus and add it to dependencies. Now click OK to apply this change. From this point on, all packages in Artenus are visible and can be used in My Game.
Fixing a mistake!
If we had referenced Artenus prior to moving the two files, the references would have been automatically updated. But right now there is a little bit of twist. To do this manually, you can add this line to every file (essentially just MainActivity.java!) that is using those classes:
import com.annahid.libs.artenus.*;
Alternatively, you can move the files back to My Game, and then move them again to Artenus. This time the references will be updated. I made this mistake intentionally for two reasons. One was to keep the article structure the way it is, the other was to make this point:
The library and the app should now be working fine together and you should be able to compile and run My Game and get the same result you got on day 6. If not, you might be missing something and I can help you find it if you drop me an email.
Next steps
We are going to work more on our texture framework as it is not mature yet, and it is definitely not used in our stage. I made this day rather short so we can talk more about interesting stuff next day.

