Before we begin designing our stage, it is good to know how stuff works. Today we create a simple OpenGL ES app. I will try to design it in a way that we can easily conform it into our engine’s library. So buckle up and open Android Studio.
Setting up the environment
Creating the project
First we need to create a project. We target the latest version of Android, while keeping it still compatible with API Level 9 (Android 2.3 Gingerbread). Thus our app will be compatible with almost 99.5% of the devices in market. So, in case you have any doubts, make your New Project’s options look like the following (click to enlarge):

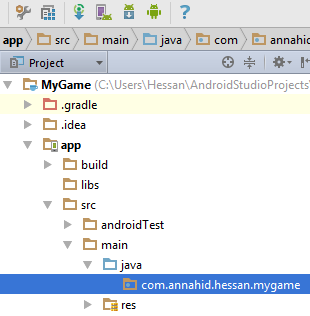
As you can see, we have selected to create no activity (in newer versions of Android Studio, this choice will appear on the next screen). This is to avoid the excess files that are automatically generated, as we want it just simple. We will create the activity manually. When you create your project in Android Studio, you will probably get an empty environment. Just press Alt+1 to see the project tree.
Creating GLSurfaceView
GLSurfaceView is a special type of View that contains OpenGL ES content. We are going to extend GLSurfaceView and add it to our main activity’s layout. This very first class will play the role of our game engine’s Stage entity later on in this guide. Open the project tree to your project’s package name.

Right-click the package-name and choose New > Java Class. Name the class Stage. We then have it extend GLSurfaceView:
package com.annahid.hessan.mygame;

import android.content.Context;
import android.opengl.GLSurfaceView;
import android.util.AttributeSet;

/**
 * Our stage is born here!
 */
public class Stage extends GLSurfaceView {
	public Stage(Context context, AttributeSet attrs) {
		super(context, attrs);
	}
}
For now we have only coded one constructor. This specific constructor is needed by the layout inflater. When our layout is being built by calling the setContentView on our activity, it is this constructor of each View that is called. The last line in the constructor is required, and it instructs GLSurfaceView to use RGBA color with 8 bits for each component.
Creating the main layout
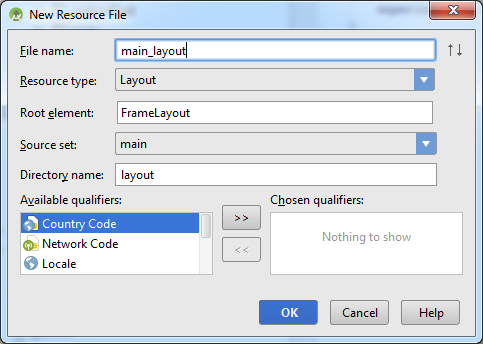
Next, we create a layout file that contains our Stage. Right-click the res folder of your project and choose New > Android resource file.

We choose FrameLayout as our root element, which will cover the whole container with only one element. As this is going to be a game and not an app, that’s exactly what we want. Now open main_layout.xml in the editor. At the bottom of the editor, there are two tabs, reading Design and Text. Go to the Text tab to view the XML code. We now add our Stage to the layout:
<?xml version="1.0" encoding="utf-8"?>

<FrameLayout xmlns:android="http://schemas.android.com/apk/res/android"
	android:layout_width="match_parent" android:layout_height="match_parent">
	<com.annahid.hessan.mygame.Stage
		android:id="@+id/my_stage"
		android:layout_width="match_parent"
		android:layout_height="match_parent" />
</FrameLayout>
Note: In the above code, com.annahid.hessan.mygame should be replaced with the package name you chose when creating the new project, if different than this.
Creating the main activity
The final step is creating the activity. Again, add a new Java class to your project’s package. I would like to call it MainActivity but you can call it as you please. Extend the class from Activity and load main_layout into it. If you are unsure how to do this, your code should look like the following:
package com.annahid.hessan.mygame;

import android.app.Activity;
import android.os.Bundle;

import com.annahid.hessan.mygame.R;

public class MainActivity extends Activity {
	@Override
	public void onCreate(Bundle savedInstanceState) {
		super.onCreate(savedInstanceState);
		setContentView(R.layout.main_layout);
	}
}
We want this activity to be the first thing that is brought to view when the user taps our app’s icon in the launcher. For that we need to modify the application’s manifest file. So, open your AndroidManifest.xml file and add the following XML snippet within the application tag.
<activity
	android:name="com.annahid.hessan.mygame.MainActivity"
	android:label="@string/app_name"
	android:theme="@android:style/Theme.NoTitleBar"
	android:screenOrientation="landscape" >
	<intent-filter>
		<action android:name="android.intent.action.MAIN" />
		<category android:name="android.intent.category.LAUNCHER" />
	</intent-filter>
</activity>
This code simply introduces our MainActivity as the main activity of the app. That’s what the children are intent-filter are doing. We also give it a title and a theme with no title bar. There is not much need for a title bar in a game!
Coding the surface
Assigning a renderer
Before we can use an object of type GLSurfaceView, we must assign a renderer to it. A renderer is a Java interface that plays these roles for a GLSurfaceView:
- Initialize the OpenGL ES context
- Modify the context when necessary
- Draw frames (render)
We create a private inner class in our Stage, which implements Renderer:
private class MyRenderer implements GLSurfaceView.Renderer {
	public final void onDrawFrame(GL10 gl) {

	}

	public final void onSurfaceChanged(GL10 gl, int width, int height) {

	}

	public final void onSurfaceCreated(GL10 gl, EGLConfig config) {

	}
}
To use this class, add the following lines at the top of Stage‘s constructor (below the super call):
setEGLConfigChooser(8, 8, 8, 8, 0, 0);
setRenderer(new MyRenderer());
The first line configures OpenGLES with RGBA_8888 color scheme (8 bits for each of R, G, B, and A components). The second line creates a new instance of MyRenderer, and appoints it to handle the current instance.
Initializing OpenGL ES context
The function onSurfaceCreated of the renderer is used to initialize OpenGL ES. It is called as soon as the View is created and is ready. However, you should have two things in mind:
- Be careful that at this stage, the View might be not laid out yet and dimensions might not be available.
- This code is run only once when the object is created. So we should only do one-off tasks here.
We do all the initial tasks as follows. I have put comments in the code so you know what each part is doing:
public final void onSurfaceCreated(GL10 gl, EGLConfig config) {
	// Set up alpha blending
	gl.glEnable(GL10.GL_ALPHA_TEST);
	gl.glEnable(GL10.GL_BLEND);

	// We will discuss this line later along with textures
	gl.glBlendFunc(GL10.GL_ONE, GL10.GL_ONE_MINUS_SRC_ALPHA);

	// We are in 2D. Who needs depth?
	gl.glDisable(GL10.GL_DEPTH_TEST);

	// Enable vertex arrays (we'll use them to draw primitives).
	gl.glEnableClientState(GL10.GL_VERTEX_ARRAY);

	// Enable texture coordinate arrays.
	gl.glEnableClientState(GL10.GL_TEXTURE_COORD_ARRAY);
}
About vertex and texture coordinate arrays, don’t worry if you don’t know what they are. They will be covered in later days. Alpha blending is also better explained when we get to textures.
Responding to layout changes
The OpenGL context needs to know exactly the area it should render to, and it should be adjusted accordingly. In the previous section we mentioned that onSurfaceCreated was not a good place to do this, because the dimensions are essentially unknown. That’s why there is another function called onSurfaceChanged which is exactly for this purpose. Each time a layout is applied to the GLSurfaceView, this method is called. This includes manually handled screen orientation changes.
What we are going to do here is as follows:
- Set the clear color of the stage to black (R:0 G:0 B:0 A:1).
- Set up a projection matrix based on width and height of the View (to project back to the basic cube).
- Load identity matrix. OpenGL’s visible space is a 2x2x1 cube. All the images you see on your HD screen in 3D are results of matrix multiplications that map all those big numbers onto these dimensions. Movement, rotation and scaling are also performed using matrices. So, loading the identity matrix in the beginning makes sure all objects are initially drawn straight and without any transformation.
Our final code for this function will be something like this:
public final void onSurfaceChanged(GL10 gl, int width, int height) {
	gl.glClearColor(0, 0, 0, 1);

	float w, h;

	if(width > height) {
		h = 600;
		w = width * h / height;
	} else {
		w = 600;
		h = height * w / width;
	}

	gl.glMatrixMode(GL10.GL_PROJECTION);
	gl.glLoadIdentity();
	gl.glOrthof(0, w, h, 0, -1, 1);
	gl.glMatrixMode(GL10.GL_MODELVIEW);
	gl.glLoadIdentity();
}
In the code above, we first check the orientation using width and height. We always make sure the smallest dimension always is interpreted to 600 and with larger one scaled accordingly. This makes it easy to handle various screen sizes as we always have to work with the same dimensions regardless. This will not affect quality. If the end user has an HD or higher screen, they will still be able to see crisp graphics. But it does make it easy for us to develop a game.
To understand the last five lines of the function, you should know about matrix modes. We just learned what matrices do in OpenGL. There are two main matrix modes:
- Projection: When on this matrix mode, we will set how your points are projected onto the screen. You can view it as the matrix that affects the camera.
- View: When on this matrix mode, we will set how objects are transformed. We usually alter the view matrix once before drawing each object.
The function glOrtho sets the simplest projection matrix. Before we do so, we switch to GL_PROJECTION matrix mode, because we want to adjust the camera. An orthogonal camera is one in which there is no perspective. That’s not a big deal as we are working in a 2-dimensional environment and we don’t need perspective. The parameters of this function are (from left to right): left, right, bottom, top, near, far. You are probably with the first four. The last two are for the depth dimension. The near edge is where the one closest to the camera and the far edge is the one the farthest (after which nothing will be drawn).
glOrtho. The reason is that glOrtho multiplies the orthogonal projection matrix with the current matrix. So wee must reset our matrix to identity to avoid unwanted behavior.After setting the projection matrix, we will switch back to view matrix, because once set, we no longer need to change the camera and we will only be working with objects.
Completing main activity
Screen settings
Before we can continue, we need to make some small changes to our activity. The first changes we are going to make is about how a game should appear on a mobile device. Most games have the following in common:
- They are full-screen.
- They override normal back-light and screen behaviour and make screen always on.
In order to do this, we should modify some window flags. So in onCreate of MainActivity we add the following lines of code:
getWindow().addFlags(WindowManager.LayoutParams.FLAG_FULLSCREEN);
getWindow().addFlags(WindowManager.LayoutParams.FLAG_KEEP_SCREEN_ON);
getWindow().clearFlags(WindowManager.LayoutParams.FLAG_FORCE_NOT_FULLSCREEN);
OpenGL ES life-cycle
A very important modification we should make to our activity is management code for OpenGL ES life-cycle. We do not want our app to continue working after we navigate out of the app. Rendering is a heavy task and it should be stopped when activity is not in view, in order to save system resources (memory, processor time) and battery life. Make a variable of type Stage (the class we made on day 5), in your activity and acquire it from the layout, after applying it (under setContentView):
stage = (Stage)findViewById(R.id.my_stage);
Now, we need to notify stage whenever our app pauses or resumes. GLSurfaceView will then make sure resources are freed when needed.
@Override
protected void onPause() {
	super.onPause();
	stage.onPause();
}

@Override
protected void onResume() {
	super.onResume();
	stage.onResume();
}
Next steps
At this point you will be able to run your project without any error. It will do nothing and will only show a black screen. You can download today’s files below:

