Introduction
We have implemented sprites so far. In order to create games with our framework, we need to handle sprites in a systematic way. Today we go one more step up the ladder. In a real world game, it matters in what order objects are drawn on the screen. In a 3D game, the distances of objects from the camera (meshes) determine which objects block others. A tree standing right in front of the camera for example, blocks a ball which is right behind it.
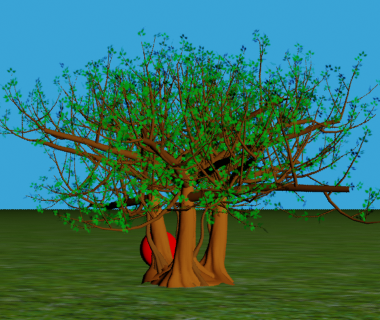
In 2D scenes there is no depth. In this case the common approach used is to use something called a z-index. Z-index is a number that determines the stacking order of objects. Objects with lower z-index are drawn first, and those with higher numbers are stacked above them, potentially blocking them from view.
Our approach in Artenus is somehow different. Our sprites’ stacking orders cannot be changed. Instead, we use scene layers: we divide our sprites into several layers, and the order in which layers are drawn is predetermined. The first layer is drawn first, then the second layer, and so on.
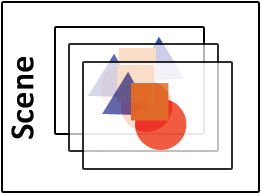
To give an example of how sprites can be broken into layers, take a look at the following game screenshot (which is made using the final version of Artenus):
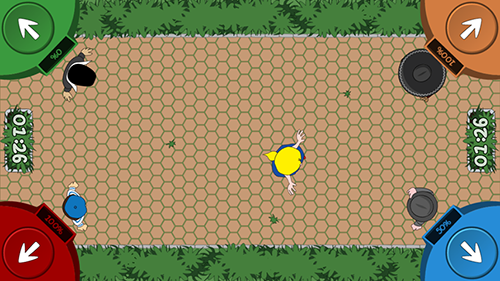
In this scene, there are three layers:
- Background: includes the grass and flower boxes.
- Game: includes game characters and the four panels on the corners
- HUD: includes timers, and any pop-up bonus effect. This layer is drawn last, so all sprites on this layer are always on the top.
Now that you know what we mean by sprite layers, we can begin implementing them.
Basic structure
Our scene layers are very simple and they are nothing more than mere collections of sprites. What makes the real difference is how they are treated in the scene. In fact what we are going to implement today is a simplified version of Java’s ArrayList with added rendering and animation handling methods. So, create a class named SpriteCollection as a sibling to Sprite and start it like this:
package com.annahid.libs.artenus.sprites;

public final class SpriteCollection {
	private Sprite[] elementData;
	private int size;

	public final Sprite get(int index) {
		if(index < size)
			return elementData[index];

		return null;
	}
}
The above class is very simple. All it contains is an array of Sprites and an integer indicating the number of items. This will be a dynamic list, to which indefinite number of sprites can be added. The reason we don’t directly derive from ArrayList is that we don’t all the features there (such as iterators) and we want a minimal implementation for speed and ease of use. Besides, there might be cases in a game where this collection is changed by one thread, while it is being consumed by another. ArrayList doesn’t like these situations.
The get method simply returns the element at the desired index, or null if index is out of range. You might notice that the array is not instantiated here, but that’s what we’ll do next.
Constructors
We will have two constructors for this class. One where we will specify an initial capacity for the array, and one we will assume the capacity of 20.
public SpriteCollection(int initialCapacity) {
	if (initialCapacity < 0)
		throw new IllegalArgumentException("Illegal Capacity: " + initialCapacity);

	elementData = new Sprite[initialCapacity];
	size = 0;
}

public SpriteCollection() {
	this(20);
}
What the constructor does is simply instantiate our array with given capacity. Note that capacity is different from collection size. The collection starts with a size of zero. A capacity of 20 only means that until 20 items are added, the array can hold the items and there will be no extra performance cost.
Adding a sprite
Adding an element can be as simple as filling in the current element of the array. The size field, beside showing current size, serves as a pointer to the next available element. Its value is always 1 more than the index of the last item. So, to add an item we already know which index to use, and once we’re done we have to increment the size. We can do all this in one line of code:
elementData[size++] = sprite;
But will this be enough? Let’s say our array is initialized to have a size of 10. Until we add the 10th element to the collection, we are fine. But upon adding the 11th, the index runs past the size of the array and trying to access the 11th element (at index 10) causes an exception. That’s why this one line approach is not sufficient. What we need to do is to ensure the array is big enough to add another element prior to addition. For this reason we add a new private method:
private void ensureCapacity(int minCapacity) {
	int oldCapacity = elementData.length;

	if (minCapacity > oldCapacity) {
		// TODO: Increase capacity
	}
}
This method takes a number for the required capacity, and if our array has less capacity, it increases it. Of course, an array’s size in Java cannot be altered when it is instantiated. To accomplish this we should create another array with a bigger size, and copy all elements of the smaller array into it. So, the TODO part of the above code becomes like this:
int newCapacity = (oldCapacity * 3) / 2 + 1;

if (newCapacity < minCapacity)
	newCapacity = minCapacity;

final Sprite[] newElementData = new Sprite[newCapacity];
System.arraycopy(elementData, 0, newElementData, 0, size);
elementData = newElementData;
Let’s go through the above code. Each time we want to increase the capacity, we increase it by 50%. We create a new array with the increased size, fill it in with current elements, and then replace the old array with it. The old one later gets garbage collected. The important point here is the use of System.arraycopy to copy the array. While we could use a for loop to perform this copy, the approach we used is shorter and much more efficient. As a general rule, we should always use standard library methods where they exist.
With this method in place, our add method can now be implemented as below:
public final void add(Sprite sprite) {
	ensureCapacity(size + 1);
	elementData[size++] = sprite;
}
For more flexibility, we can also have another version of the add method to insert an item at the given index.
public final void add(int index, Sprite sprite) {
	if(index >= 0 && index < size) {
		ensureCapacity(size + 1);
		System.arraycopy(elementData, index, elementData, index + 1, size - index);
		elementData[index] = sprite;
		size++;
	}
}
What we do here is to shift all items starting at the desired index by one by copying the whole chunk of the array.
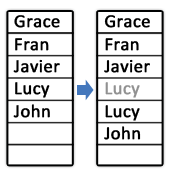
Then we simply replace the desired index with the new sprite.
Removing a sprite
Removing a sprite is similar to our second add function. We first find the index of the sprite we have to remove. Then simply shift all following items backwards by one, causing each element, including the removed one to be replaced by the element immediately following it.
public final boolean remove(Sprite sprite) {
	for (int index = 0; index < size; index++)
		if (sprite.equals(elementData[index])) {
			final int numMoved = size - index - 1;

			if(numMoved > 0)
				System.arraycopy(elementData, index+1, elementData, index, numMoved);

			elementData[--size] = null;
			return true;
		}

	return false;
}
The function returns false if the requested element does not exist in the array. The variable numMoved here is used to determine the number of elements that need to be moved, which is the number of valid elements tailing the removed one in the array.
Clearing the collection
Sometimes we might want to clear the collection completely. In such case we must disassociate all elements so they can be collected by garbage collector. Setting all elements to null will do the job.
public final void clear() {
	for(int i = 0; i < size; i++)
		elementData[i] = null;

	size = 0;
}
Rendering and animation
Scene layers in Artenus are able to render themselves. This is the most straightforward part of implementation. We just go through all sprites and call their render method.
public final void render(GL10 gl) {
	for(int i = 0; i < size; i++)
		if(elementData[i] != null)
			elementData[i].render(gl);
}
The null check is there for good measure, in case and element gets popped by another thread just before we try to render it. Similarly, layers can advance their sprites’ animations.
public final void advance(float elapsedTime) {
	for(int i = 0; i < size; i++)
		if(elementData[i] != null)
			elementData[i].advanceAnimation(elapsedTime);
}
With these two methods in place, the scene need not handle sprites individually any more.
Next steps
We are getting closer to a working solution. The final few steps include the implementation of Scene and completion of Stage. Of course we haven’t yet implemented input. We will hopefully cover input in the next part. By the end of the current part of GDD, you will be able to create animated content and if you already know how to handle input in Android, you will be able to create simple games using our little framework. If you don’t, there is nothing to worry. Everything will be explained at some point in these tutorial series. Below is the complete implementation of SpriteCollection.
