How to Setup a Soekris net4801 Wireless Station
This guide is directed to people who would like to build a similar wireless testbed as the present testbed from scratch. This page is an explanation of how to setup a Debian-based wireless station on a Soekris net4801 box. The process might be time-consuming if you want to do it without any prior knowledge of the devices involved. But using this guide you should be able to do it without any problems. A basic knowledge of Linux is expected.
1. What You Need
1.1 Hardware
You will need the following hardware before starting to create your station:
-
Soekris net4801: This is actually the device you would like to work with. You can order one here.
-
CF Memory Card: Soekris net4801 has a CF slot, which will serve as the main hard disk the system will boot from. I used a 4GB CF card and strongly recommend this size.
-
Broadcom B4318: This is the wireless card you will be going to use on the device. It is a mini-pci, which fits directly on the net4801 device board.
-
CF Card Reader: This is required to use for the virtual machine prior to deployment of the new station.
-
USB/Serial Converter: You will need it to connect your Soekris box to the host machine through serial port, for software installation and finalizing setup.
-
Internet Connectivity: Your host computer must be connected to the internet throughout the configutation.
1.2 Software
The software you will need will be described more broadly in the following sections. However, for start, you will need the following software pieces on your host computer for sure:
-
Oracle VM VirtualBox: We will use this application for creating virtual machines to setup our system. Among other VM technologies, this one allows for using an external device as a hard drive. Take a look at https://www.virtualbox.org/ for more information and to download the software package.
-
Debian Linux ISO Image: You can download it from the debian website. You can
download version 7.2.0 from official Debian website. I have used version 6.0.4, which looks not to be available any more. If you fall into any trouble with the new version, please drop me a line as I still have hands on a copy of 6.0.4.
Later on, you will also need to install the following software pieces on the device. But these are not necessary to actually boot the device. These are to conform it into a test-bed unit:
-
Linux Kernel 2.6.32.16: You can download this kernel from http://www.kernel.org/, but then you will have to configure it for the needs of the net4801 devices. Good news is, I have done this before and I have put the new sources here for download. When it comes to kernel upgrade, you should have this file ready in your host computer.
-
Compat-Wireless: This is a series of drivers for different wireless cards available. The original version is not completely compatible with our needs, so I have put a slightly modified version here, which is available for download. Note that this version is for use with kernel version 2.6.32.16, which we will install on the device.
-
OpenFWWF: This is the open-source firmware for B43xx wireless cards. The original firmware is downloaded from its official website. But I have packaged a slightly modified version which is suitable for testing, along with the required tools for compilation and debugging. You can download this package this link.
I strongly recommend downloading these packages, as this guide is based on using all the packaged provided. Otherwise, you will have to download the tools from various places, some of which might not be compatible with our configuration. If you need an unmodified version of the firmware, I suggest downloading and replacing individual files.
2. Operating System Installation
2.1 Creating a Virtual Machine
Take the following steps for creating a virtual machine on the CF card.
-
Plug-in the CF card reader with the CF card inserted, into a USB slot.
-
Run the following series of commands in a terminal window (assuming /dev/sdb is the the usb drive):
umount /dev/sdb1

	sudo VBoxManage internalcommands createrawvmdk -filename usb-mc.vmdk -rawdisk /dev/sdb

	sudo VirtualBox &
The VirtualBox window will pop out. You will need this window throughout this section.
-
In VirtualBox, click New to create a new virtual machine. Give it a name and choose Debian Linux for the OS Type. Give it as much RAM as you wish. When choosing hard disk, click the “Use existing hard disk” option, and browse for the usb-mc.vmdk file you have created using the previous commands.
-
Right-click the newly created machine, and click “Settings…”.
-
Go to storage and in the IDE section, click + (Add CD/DVD Device).
-
Click “Choose Disk” and browse for the Debian image you downloaded before. You can remove the other CD/DVD drive in the list.
-
Start the virtual machine.
2.2 Installing Debian Linux
Having done as instructed in the previous section, you should now have the Debian Installer screen dispayed.
-
Click Install and go through the installation process with your own choices, until you get to the stage to the partitioning section.
-
We it comes to partitioning, choose to use the entire disk.
- Continue with the installation. Choose NO when asked to use a network mirror, and when asked for extra software, just leave the default and continue.
-
When the installation is complete, boot and login as root.
-
Make sure /etc/apt/sources.list looks like this:
deb http://ftp.ie.debian.org/debian/ squeeze main contrib non-free

deb-src http://ftp.ie.debian.org/debian/ squeeze main contrib non-free

deb http://security.debian.org/debian/ squeeze/updates main

deb-src http://security.debian.org/debian/ squeeze/updates main
-
Run the following series of commands in a terminal window:
apt-get update && apt-get -y upgrade

	apt-get -y install build-essential
2.3 Upgrading Linux Kernel
It is now time to upgrade to our pre-configured kernel version 2.6.32.16. If you have not downloaded it yet, re-read the instructions in section 1.2. Otherwise, take the following steps:
-
Run the following series of commands in a terminal window:
cd /usr/src/

	scp user@host-ip:/path/to/linux-2.6.32.16.tar.gz .

	tar -xzf linux-2.6.32.16.tar.gz

	rm linux-2.6.32.16.tar.gz

	cd linux-2.6.32.16

	make && make modules && make modules_install && make install && update-initramfs -c -k 2.6.32.16
The last line will take a long time to complete, which gives you a coffee-break opportunity!
-
Next, we are going to downgrade GRUB 2 to GRUB Legacy as it is easier to use. To do this, run the following commands:
apt-get remove grub-common grub-pc

	mv /boot/grub /boot/grub_backup

	mkdir /boot/grub

	apt-get autoremove

	apt-get -y install grub-legacy

	grub-install /dev/sda

	update-grub
In the above commands it is assumed that your disk is mounted on /dev/sda. You can find out using fdisk -l
-
Open /boot/grub/menu.lst. There should be a line that looks like this:
kernel /boot/vmlinuz-2.6.32.16 root=UUID=de65447a-3c3a-4379-afee-c0e2182ab49b ro console=ttyS0,19200Note that the number after UUID might be different in your case. Change the line to:
kernel /boot/vmlinuz-2.6.32.16 root=/dev/hda1 ro console=ttyS0,19200Also add the following lines to the top of the OS list you just modified:
serial --unit=0 --speed=19200 --word=8 --parity=no --stop=1

terminal serial
Then save the file.
-
Open /etc/inittab and add this line to the very end:
T0:23:respawn:/sbin/getty -L ttyS0 19200 vt100 -
Shut down the machine. Take out the memory card and plug it into a Soekris box. If this is the first time you are setting up a station, read the instructions in this section before proceeding. You should now install minicom on your host machine, and boot your kernel in a Soekris box. See this guide.
3. Setting Up Software
In this section we will setup the system’s wireless subsystem and scripts, which is the final purpose of the device we are configuring. We also setup ethernet settings and install tools for remote access to the station.
3.1 Installing Driver and Firmware
We first install compat-wireless drivers. In order to do this, take the following steps:
-
Update date and time as it might have been reset. The format you should use in the date commdn is MMDDhhmmYY. For examplem, if today is Mar 8, 2012 11:10, you should write:
date 0308111012 -
Run the following series of commands in the serial console:
cd /usr/src/

		scp user@host-ip:/path/to/compat-wireless.tar.gz .

		tar -xzf compat-wireless.tar.gz

		rm compat-wireless.tar.gz

		cd compat-wireless

		make install && make unload
Again, the last command takes a relatively long time to excute. With compat-wireless installed, you are close to the end.
-
In order to install the firmware, we need to install a few software packages. Run the following commands to install the required packages:
apt-get install bison flex -
Download and unpack the firmware package using the following commands:
cd /usr/src/

		wget http://hessan.annahid.com/download/openfwwf-5.3.tar.gz

		tar -xzf openfwwf-5.3.tar.gz

		rm openfwwf-5.3.tar.gz
-
The firmware is in the assembly language specific to the BCM4318 chip. Therefore, we should install the required assembly tools to compile it. This can be done by running the following commands:
cd b43-tools/assembler

		make && make install

		cd ../disassembler

		make && make install

		cd ../debug

		./install.py

		cd ../fwcutter

		make && make install
-
Now we finally install OpenFWWF. Run the following commands to do it:
cd ../../openfwwf-5.3/

		make && make install
Now your station has all the required means for a typical wireless station. In the next subsection we will conform it to our specific needs.
3.2 Preparing Station for Testing
In this section we will install tools and scripts required for the testbed.
-
First we install all the remaining packages which will be required by the station. Run the following command to do so:
apt-get -y install perl ssh ntpdate wireless-tools iwSome packages are directly needed in the following steps.
-
Next, we install testing scripts. I have encapsulated all required scripts in one place. To setup the station, download this file and extract it using the following command sequence:
cd /usr/src/

		scp user@host-ip:/path/to/sta-setup.tar.gz .

		tar -xzf sta-setup.tar.gz

		rm sta-setup.tar.gz
-
Install the scripts using the following commands:
cd sta-setup

		./install 56
You can replace 56 by any number in the range (0, 255). This will be the last byte in the IP address of the station for all its interfaces (10.220.2.xx).
4. Final Installation Tips
4.1 Hardware Installation
If you have done everything up to this section, you probably don’t need this subsection. However, for those who don’t know how to set up the box, I will give a quick guide. Here is how the net4801 board looks like:
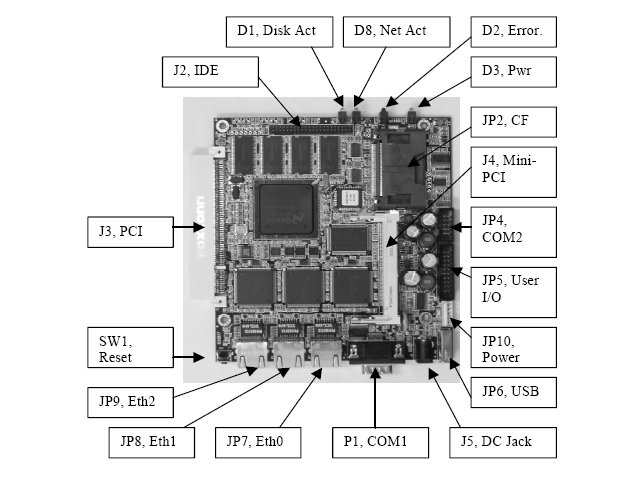
To set up the Soekris net4801 box for the first time with a Broadcom BCM4318 wireless adapter, do as follows:
-
Plug a Broadcom BCM4318 MiniPCI card into the MiniPCI slot on the board (J4 in the picture).
-
Plug your CF memory card with the system installed, into the CF slot (JP2 in the picture).
-
Plug an Ethernet cable which is connected to the testbed network into the eth0 jack (JP7 in the picture).
-
Connect a serial cable to the serial port (P1 in the picture) and connect it using a USB Serial Converter to a USB slot in your host machine. You will use this to open a serial terminal to the device.
-
Finally, connect the power adapter to the DC jack (J5 in the picture) and plug it into your power plug, whenever you want to start the machine.
4.2 Replication
Once you have done the installation on one machine, the other machines can be just copied from the first one, and you do not need to go through the whole procedure again. In this section, I will explain how you can do this.
Saving an image of the current installation:
-
Take out the CF card from the source box and plug into your memory reader attached to the host machine.
-
Run dmesg immediately in a terminal window to find out the device name assigned to the CF card. For example, if dmesg gives you the following lines:
[ 1736.662321] EXT3-fs (sdb1): using internal journal

[ 1736.662324] EXT3-fs (sdb1): recovery complete

[ 1736.669067] EXT3-fs (sdb1): mounted filesystem with ordered data mode
Then the device name assigned to the card is sdb. We will assume sdb from now on in this section.
-
Run the following command to unmount the volume before starting to replicate:
umount /dev/sdb1 -
We use the dd command to get an image of the CF card. You can use any path for the recorded image. This is how it is works:
sudo dd if=/dev/sdb of=/path/to/imageThis command takes more than an hour to complete. It is recommended to do it over a very long break.
-
After the previous step is complete, take out the CF card from the reader and put it back to the source box. From now on, you have the image for that installation on your hard drive.
Replicating using the written image:
-
Put the CF card you want to put on a new box into a CF card reader connected to your host computer.
-
Unmount it like you did when getting the image.
-
To write the image to the CF card, we use dd again, but like this:
sudo dd if=/path/to/image of=/dev/sdbAgain, keep in mind that this is a timely procedure.
-
After completion, take out the CF card and plug it into your new Soekris box. Boot your box using the serial terminal, login as root and perform the following commands in order:
cd /usr/src/sta-setup

./install 54
Replace 54 with your desired number for the station, which is unique in your testbed. Again, this will be the last byte of the IPv4 address for the station.
-
Shut down the device, disconnect the serial cable, and put the device alongside your other stations in the testbed.